Natural referencing: getting off on the right foot with WordPress
Published on June 5, 2018 by Team Infomaniak
No matter what web project we are starting, we create a website so that it can be seen by the greatest number of people possible. Is there anything more dispiriting than investing precious time in creating quality content and then finding that nobody looks at it?
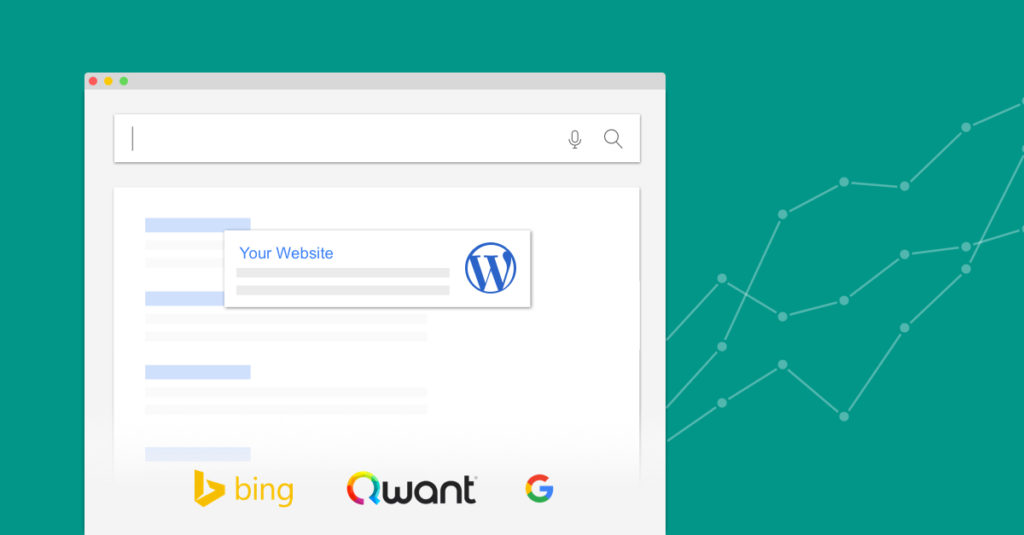
To get a website known, you need to have a presence in the place where the vast majority of internet users start their exploration when they have questions they want answered: in the search engines. It is therefore essential to help internet users find your content easily when they are performing searches related to your online activities on Qwant, Google or Bing.
To increase a website’s traffic, you first have to manage to attract search engines and allow them to effectively index your content. That is what we call indexing. This stage takes place before referencing and is fundamental. Fortunately, these mechanisms can be affected positively through search engine optimisation techniques.
This article offers a basic guide to natural referencing and setting up traffic monitoring for a site created with WordPress. SEO is a whole subject in itself and to look at it in more depth, we suggest you contact a professional or read this guide, which was written by a SEO specialist from the agency, SeoMix. It goes into more detail regarding best practices to observe in order to improve a website’s natural referencing.
After you have followed this article:
- your site will be indexed by the main search engines,
- you will have tools for improving natural referencing for your site,
- you will have set up solutions which allow you to analyse and monitor your site’s traffic.
Declare your site to the search engines
Search engines continually explore the internet looking for new sites to index, and may take a long time to find yours.
To speed up your site’s referencing, it is often possible to directly “declare” a site to cause it to be indexed, using a tool suited to each search engine:
Link your site to the Google Search Console with Yoast SEO
As Google is still the most widely used search engine, we are going to show you how to use its search console. Google Search Console (previously known as Google Tools for webmasters)allows you to check and optimise the indexing of your websites. This console will indicate the keywords internet users discover your site with, as well as potential errors which may affect its referencing.
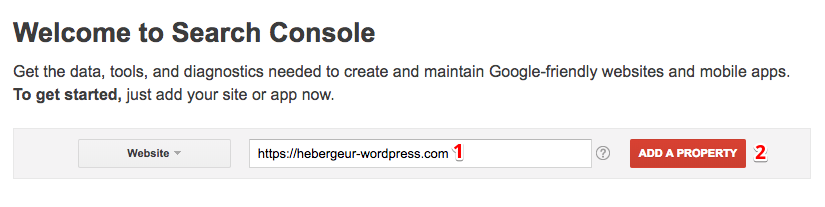
To link your site to the Search Console, start by going to Google Search Console and add your website’s URL by clicking on Add a property (for example https://www.infomaniak.com). We recommend that you add two properties per site, one in http and the other in https.
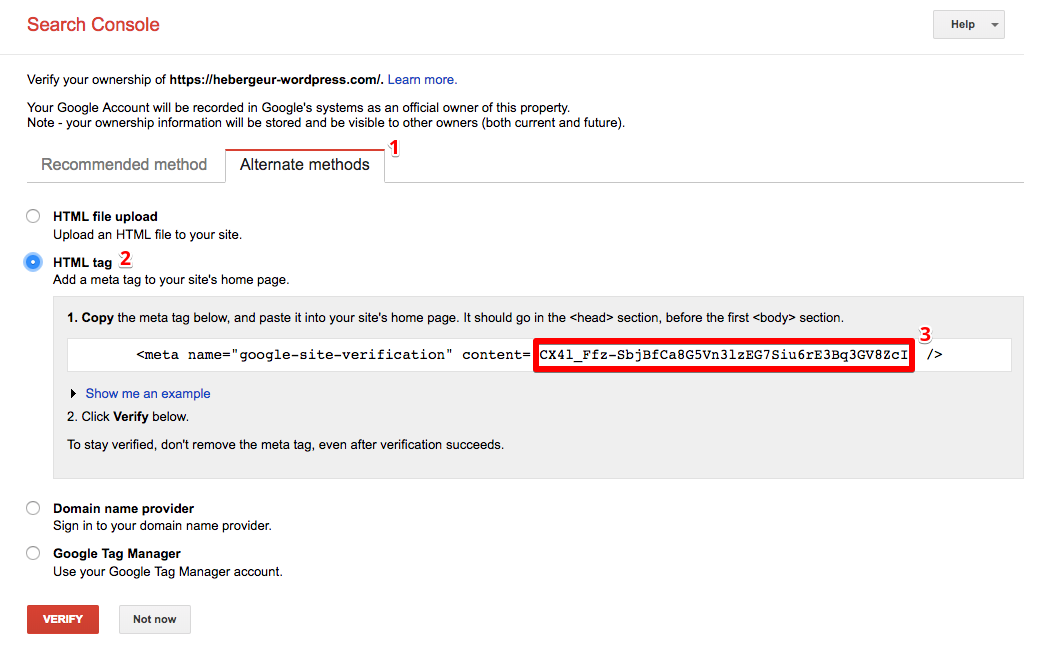
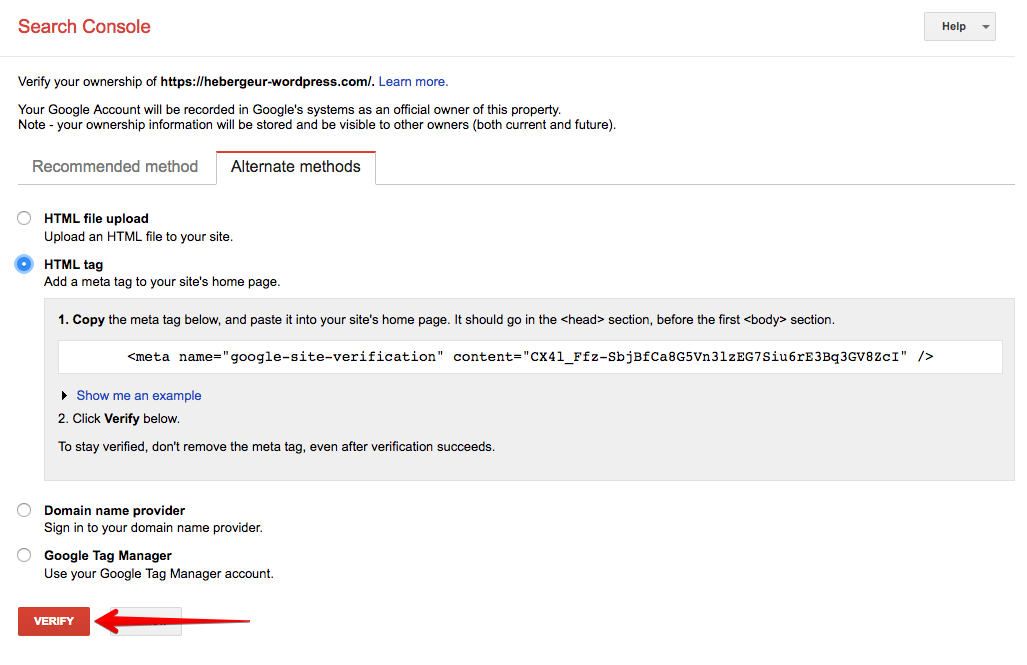
Then select HTML tag as a verification method to copy the identification code which is between the quotation marks (see point 3 on the image below).
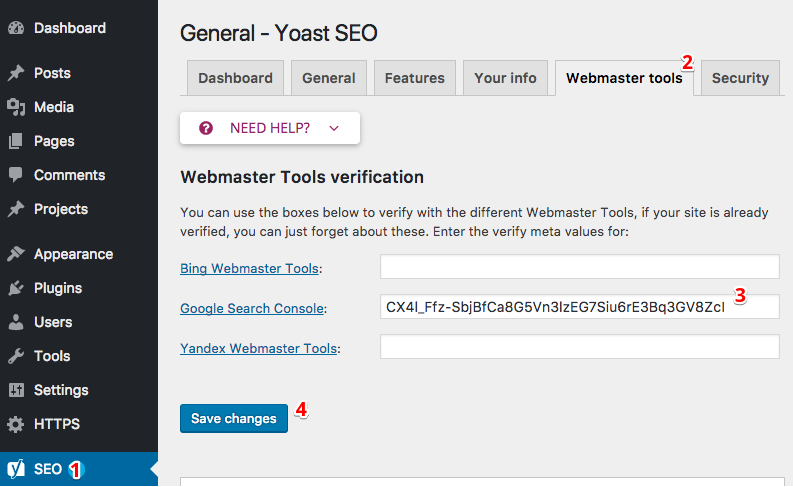
Open your website’s WordPress control panel to install and enable the extension Yoast SEO. For this, click on Extensions then on Add from the WordPress menu on the left. You just need to start a search with the keyword “Yoast SEO”.
Once the extension is enabled, click on SEO at the bottom left of the WordPress menu. In the general settings, go to the Tools for webmasters tab and paste the identification code you have recovered from the Google Search Console there.
You can now return to the Search Console to validate your site:
Congratulations, Google will now start to explore and reference your site’s content.
Generate and send a sitemap file to Google
A sitemap file allows you to easily show search engines the pages on your site to be explored. Thanks to Yoast SEO, you can create a “sitemap” file in a few clicks and add it to the Search Console.
To generate your site’s sitemap file, go to General settings in Yoast SEO then under the Features tab, enable XML site maps. Then click on the small question mark to the right of this option and click on See the XML site map to recover the URL address of the different sitemap files you will then need to enter in Google Search Console:
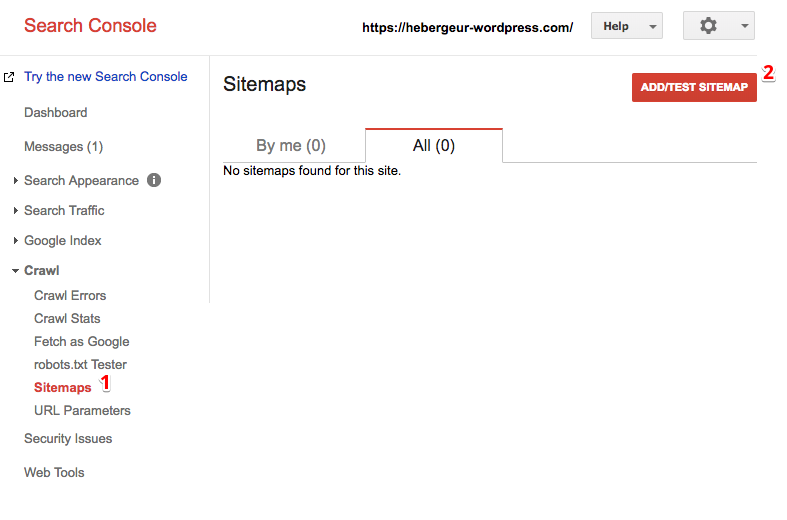
Here are the steps to follow to add the URL addresses of the sitemaps to the Search Console.
Google will now immediately index the content you add to your site. Creating these files will also help other search engines to collect information from your site.
Follow and analyse your website audience
To increase the attractiveness of your site over time, it is important to identify and understand incoming and outgoing visitor traffic on your site. Infomaniak automatically offers statistics for each of your sites which already allow you to monitor information such as the number of visitors per month, the source of your visitors, how your audience evolves very hour, the source of your traffic, the most frequently viewed pages on your site, etc. To monitor this data, you just need to log into your Manager and go to the dashboard for your web hosting.
For more detail: Matomo and Google Analytics
For more detail on analysing and monitoring your audience, you can log into tools like Matomo (formerly Piwik) or Google Analytics. While it is not free, the latter has the advantage of being linked to Adwords if you use that platform for advertising on Google.
To link your Google Analytics account to your website, log into Google Analytics using your Google account and then add your website in the Google interface.
We recommend that you then use the WordPress extension Google Analytics for WordPress by MonsterInsights to easily check your website. Once the extension is installed and enabled, go to the Insights settings and click on Authenticate with a Google account :
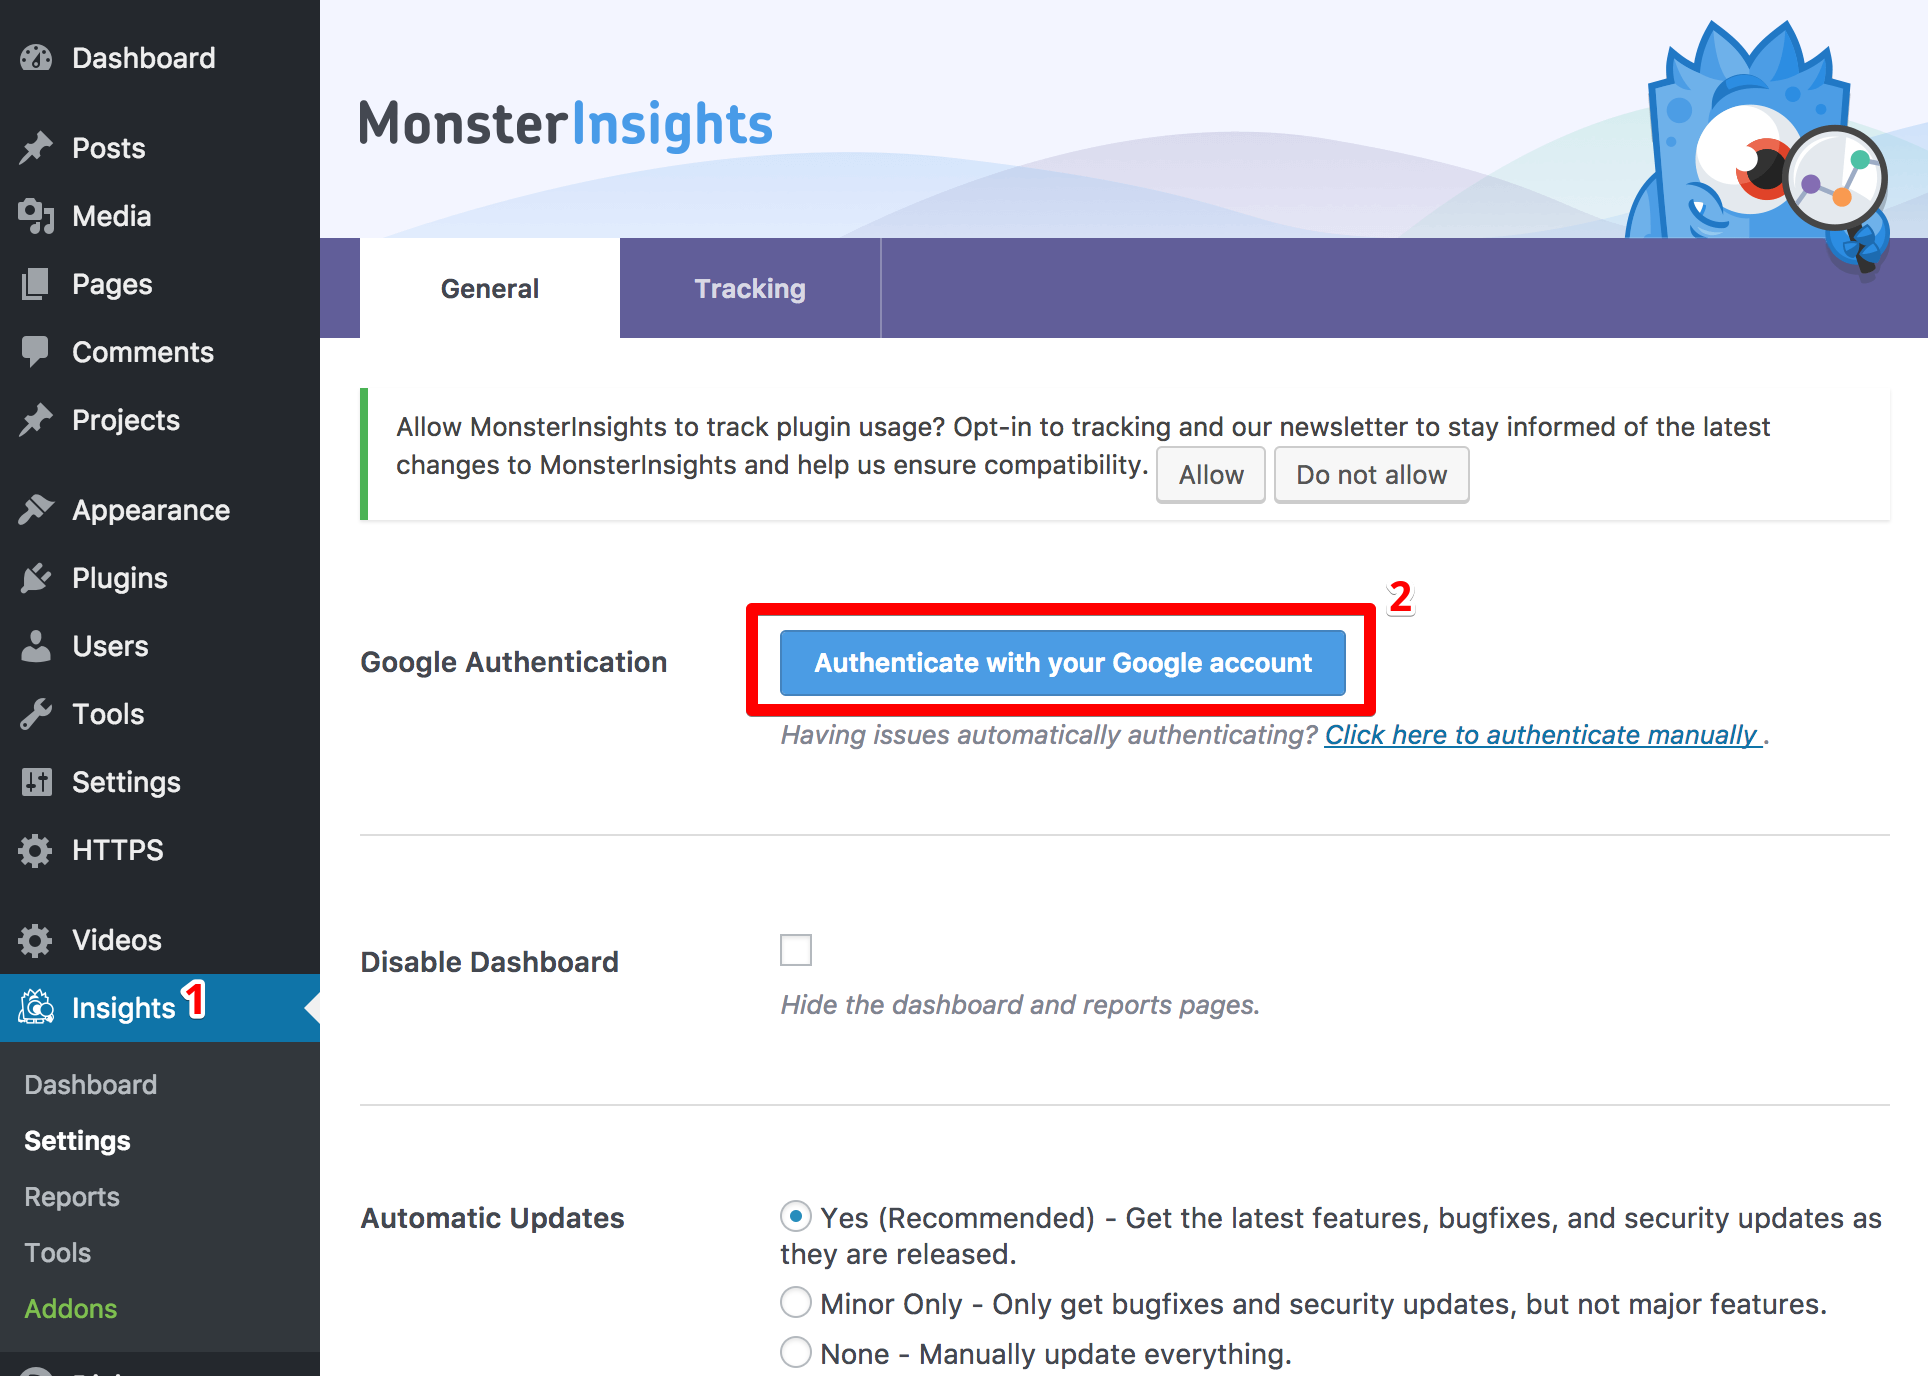
Choose the Google account used previously to register your site on Google Analytics and authorise the extension to communicate with Google. To do this,copy the code provided by the dialogue box then stick it in the MonsterInsight extension when invited to do so. Finally select the profile which corresponds to your website and save the changes.
That’s it. Your website is connected to your Google Analytics account. You will, however, need to wait a few days before you see the first data for visitors to your site.
Don’t forget to move a site to HTTPS
Search engines and internet users now favour sites which are secured with a SSL certificate. That is why we strongly urge you to move your sites to HTTPS, not just for the securityof their users, but also to improve their referencing. In case you need it, this article gives you all the information you will need to move your WordPress site to HTTPS.
Conclusion
Your site is now indexed in the search engines and you can analyse and optimise its referencing using statistics from Infomaniak or from a third party tool.
For more detail, you can opt to install Google Tag Manager, a “container” which is integrated into your site, inside which you can add events (tags) precise Analytics (running a page, filling in a form, etc.) as well as customised triggers. This also allows you to add external solutions, all dynamically operated without the need to change your site code extensively. To finish, you could also think about integrating Zapier to your Analytics account to create scenarios and automatise certain tasks with third party applications.
After this stage, your needs and your creativity are practically the only limit!


No comments
No comments yet.