10 ways to secure your Synology NAS in a data center
Published on March 24, 2024 by Team Infomaniak
In this article, you will learn about 10 ways to enhance the security of your Synology NAS installed in a data center or at home.
Synology NAS are becoming increasingly popular with businesses and individuals, and they may fall victim to numerous hacking attempts. To protect yourself as far as possible against this risk, take the time to follow the steps below to secure your Synology NAS.
10 tips to secure your Synology NAS
1. Enable two-factor authentication
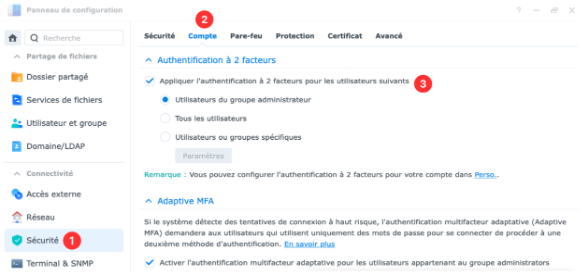
Enable dual authentication on your Synology NAS (DSM 5.2) via its control panel.
2. Choose a strong password
The password to access your Synology should consist of at least 8 characters with upper & lower case letters, numeric characters and special characters.
We recommend that you use a password manager such as BitWarden to generate and store your passwords securely.
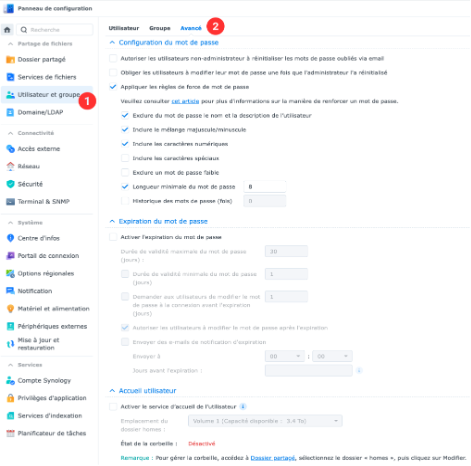
Here’s how to configure a user’s login password on a Synology NAS.
3. Deactivate QuickConnect
By hosting your Synology with Infomaniak, you get a free fixed public IP which allows you to access your NAS easily on the go.
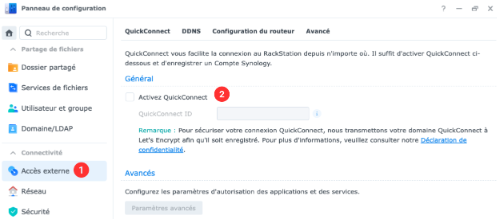
Here’s how to disable QuickConnect on a Synology NAS (DSM 5.2)
4. Modify the default http (5000) and https (5001) port number of the DSM
Modifying the default HTTP (5000) and HTTPS (5001) port numbers for Synology’s DSM (DiskStation Manager) increases security. By changing these ports, you make your NAS access address less obvious to malicious individuals, thus reducing the risk of targeted attacks.
The port number must be between 1024 and 65535.
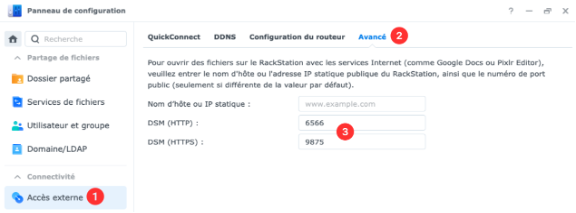
Here’s how to change the default http and https ports to access the DSM of a Synology NAS (DSM 5.2)
5. Enable https connection and redirection of connections to https
The https connection encrypts data between a browser and a website to secure information. Redirecting to https ensures that any unsecured connection is automatically converted to a secure connection.
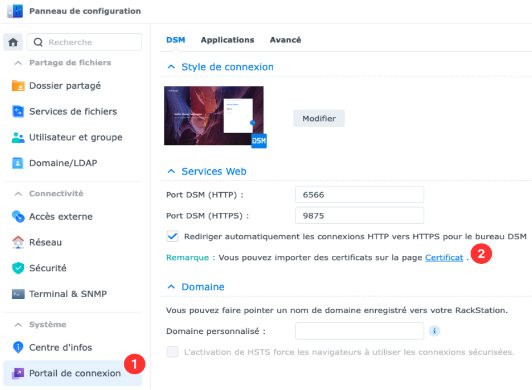
Here’s how to configure a Synology NAS (DSM 5.2) https access
6. Activate DoS protection
DoS protection prevents server overloads due to excessive requests, making sites inaccessible. At Infomaniak, professional Anti-DDoS protection secures the network. For more information, click on this link.
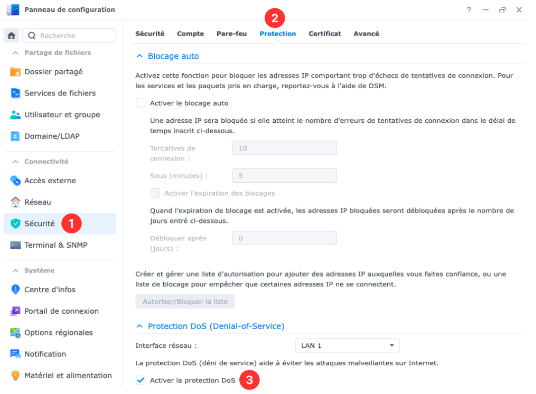
Here’s how to enable DoS protection via the control panel of a Synology NAS (DSM 5.2)
7. Disable incorporation of DSM into iFrame
Disabling the incorporation of DSM into an iFrame prevents the integration of the management interface of your Synology NAS with other websites, thus protecting against attacks such as clickjacking.
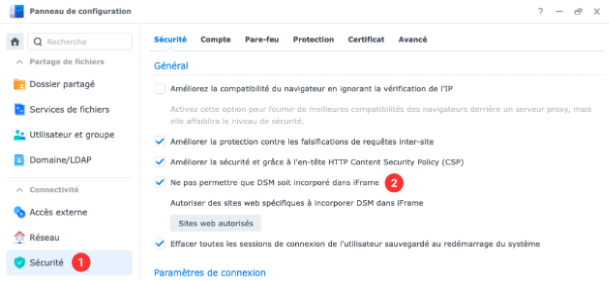
Here’s how to disable the possibility of integrating DSM into iFrame (DSM 5.2)
8. Disable IPv6
At the moment, the Synology firewall does not support IPv6. We therefore recommend that you disable support for this protocol to enhance the security of your NAS.
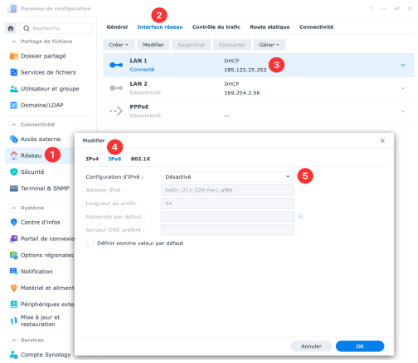
Here’s how to disable IPv6 via the control panel of a Synology NAS (DSM 5.2)
9. Configure your Synology firewall
9.1 The steps for configuring a firewall
Prior information: To configure a firewall, first close all your tabs to block all incoming connections. Then open only the specific services you want to authorise. This increases security by limiting possible access.
- On the Security tab of the control panel, click on Firewall and go to Firewall profile. Select Manage firewall profile.
- Display the drop-down menu, click on Create and enter a name to create a new profile.
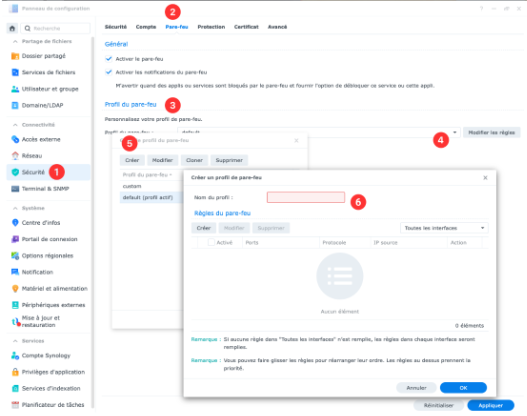
- Select the desired profile from the drop-down menu and click on Select.
- Click on the Modify rule on the right button, and click on Create to create firewall rules for the desired profile.
- Repeat the above steps until you have created all the profiles and firewall rules you need.
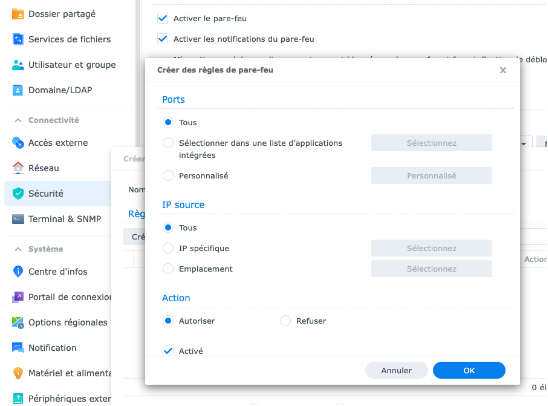
9.2 Creating a firewall rule
- In the Firewall profile section, select a firewall profile from the drop-down menu and click the Change rule button on the right.
- Select a network interface from the drop-down menus at the top right.
- Click on Create.
- In the Ports section, select one of the following rules:
- Select All to apply these firewall rules to all ports.
- Choose Select from a list of built-in apps and click Select. Select the built-in applications you want to apply to this firewall rule.
- Choose Custom and click on Custom. Enter up to 15 ports separated by a dot or specify a range of ports to apply this firewall rule.
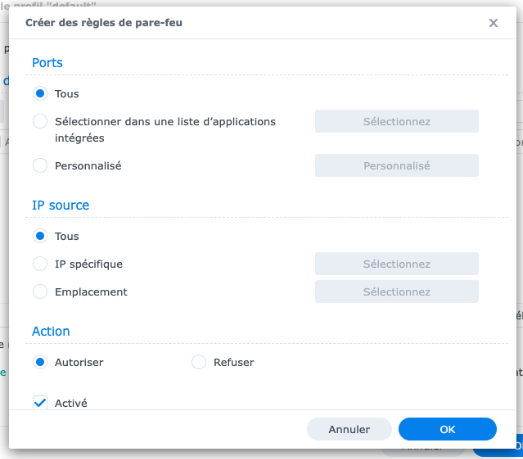
- In the IP source section, select one of the following rules:
- Select All to apply this firewall rule to all IP addresses.
- Select Specific IP and click Select. You can specify an IP address or IP range to enforce this firewall rule.
- Select Location and then specify up to 15 locations to apply this firewall rule.
- In the Action section, select one of the following rules:
- Select Allow to allow access via the source ports and IP addresses you specified.
- Select Refuse to deny access via the ports and source IP addresses you specified.
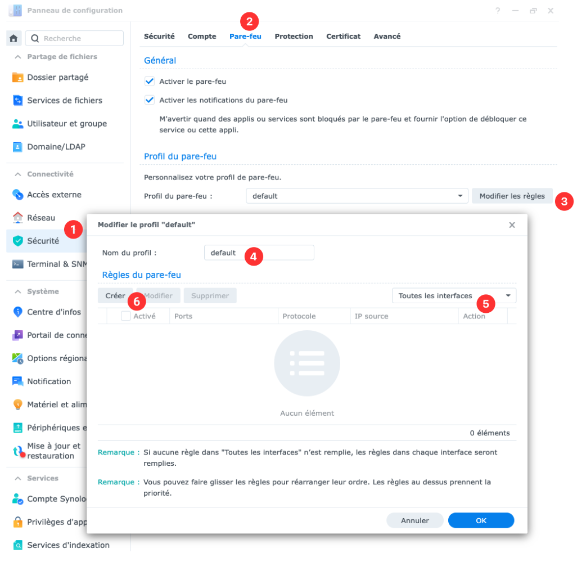
You can see the LAN and PPPoE firewall rules by selecting these interfaces via the box at the top right. At the bottom of the rule list, you can select Allow access or Deny access to allow or deny access requests that do not match an existing firewall rule for the respective interface.
10. Additional safety recommendations
- Always use the latest version of DiskStation Manager (DSM)
- Regularly update the apps you use
- Uninstall packages from applications you are not using and remove the corresponding permissions from the Synology firewall
- Consult the log centre for anomalies/alerrors/errors
- Enable email or SMS notifications for important alerts (Control panel > Notification > …)
For more security: the Synology VPN server
You should be aware that even if you follow all the safety advice in this article, all Synology services remain accessible via a simple web browser. This means that if Synology apps have flaws, they can be exploited across the web.
In this other article, you will see how to protect yourself against the latter possibility by restricting the access of your Synology NAS to the VPN service only.
Further information
- Find out more about Infomaniak’s Synology offers.
- What can I do with a NAS device? Get off to a good start with your Synology
- The need to secure your Synology NAS: summary
- How to connect a Synology NAS to a VPN?
- How do I create a VPN in Switzerland with a Synology NAS hosted by Infomaniak?
- Install a Let’s Encrypt SSL certificate on a Synology NAS


No comments
No comments yet.